

blur a background in photoshop
Blur backgrounds easily in Photoshop
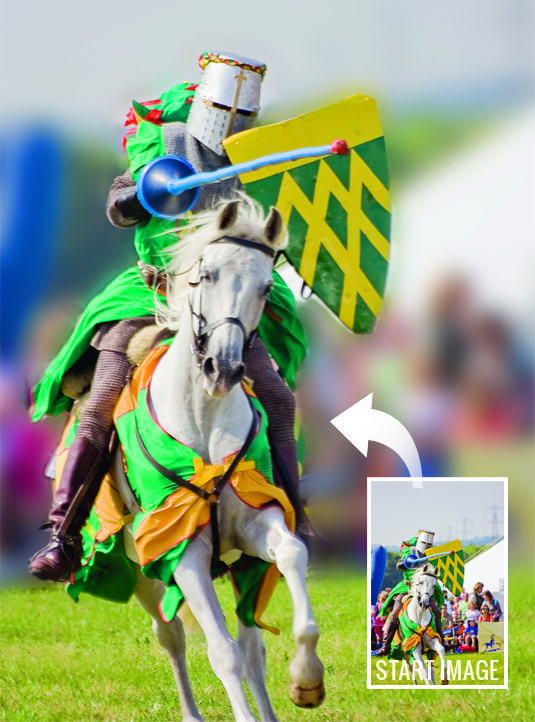
Backgrounds often ruin what is an otherwise perfect picture. Even if the subject is perfectly framed and focused, things in the distance can prove an insurmountable distraction. This is particularly true when shooting in a crowd - at a sporting event or carnival, say - as spectators and clutter are often impossible to crop out of your composition.
Throwing the background out of focus using the widest aperture that your lens allows is the obvious first step to fixing this problem. But doing this is certainly not a sure-fire solution to the issue - even if an advertising hoarding, for example, is out of focus, it can still be a significant distraction.
Photoshop fix
The Photoshop solution is to create a completely blurred version of your problem picture. By skilfully combining this with the original using a hand-painted mask, the subject looks sharp and the backdrop believably blurred. Here's how it's done in Photoshop Elements 5.0 (although the principle's the same for anything from PSE 5.0 to Photoshop CS6)...
Click here to download start image
01. Create a copy
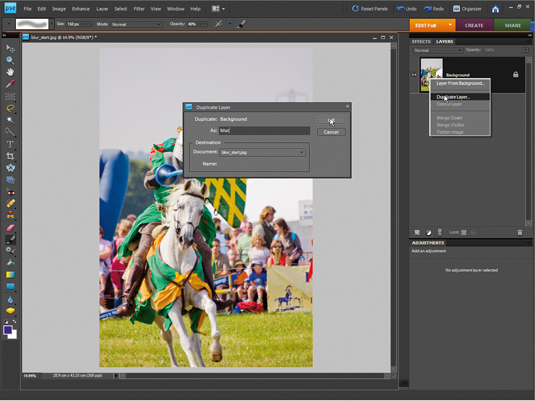
Open the image blur_start.jpg. Check the Layers palette is visible (go to Window>Layers if it's not). Right-click on the 'Background' layer icon in this palette, and choose Duplicate Layer. Rename this layer 'Blur' in the window that appears. Click OK.
02. Use a filter to add blur
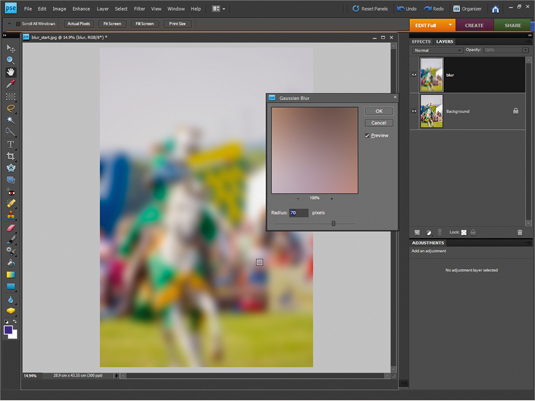
From the Filter drop-down menu at the top of the screen choose Blur, then Gaussian Blur. Set the Radius to the amount that makes the background look as out of focus as you want it - around 70 should do the trick. The main subject will also appear blurred, but don't worry about this now. Click OK.
03. Create a ghost layer
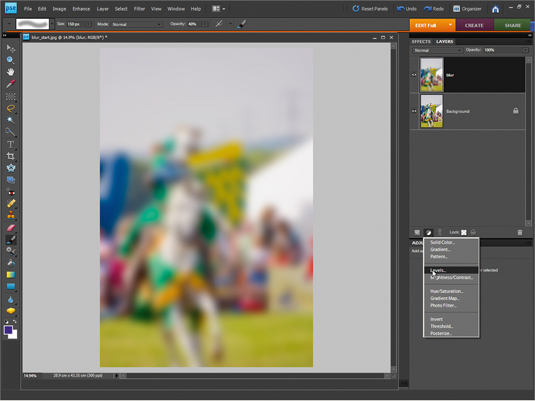
Click on the half-moon icon in the Layers palette, and pick any of the Adjustment Layer options. We've chosen Levels. Don't move any of the sliders - we're simply going to use the mask that comes with this layer to control which parts of the pictures are sharp, and which are blurred. If using Elements 7 or earlier, you'll need to click OK.
04. Cheat the system
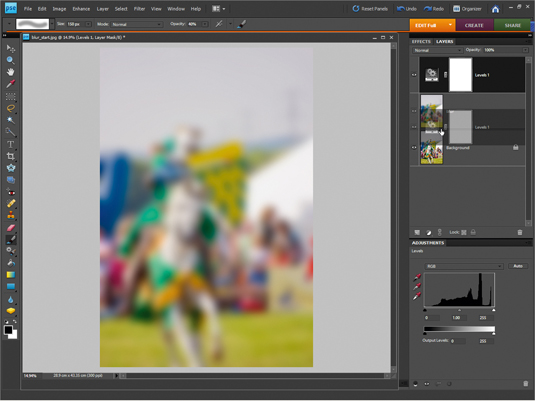
There's some jiggery-pokery needed to get the mask to work as we need it to (unless using Elements 9, where this workaround is not necessary). Drag the 'Levels 1' Adjustment Layer below the 'Blur' layer in the Layers palette. Now press the Alt key and hover the cursor between the 'Blur' and 'Levels 1' layer; when a double-circle symbol appears, left-click with the mouse. The 'Blur' layer icon will then move to the right.
05. Get out the paintbrush

Click on the white rectangle in the Levels layer. Press Alt+Delete, and the mask becomes black (and the original image is revealed again). Grab the Brush tool and select a soft-edged brush from the preset picker. Set Size to 500 pixels and Opacity to 100%. Set the foreground colour to white (press X). Paint over the background to reveal the blurring beneath.
06. Fine tune the mask
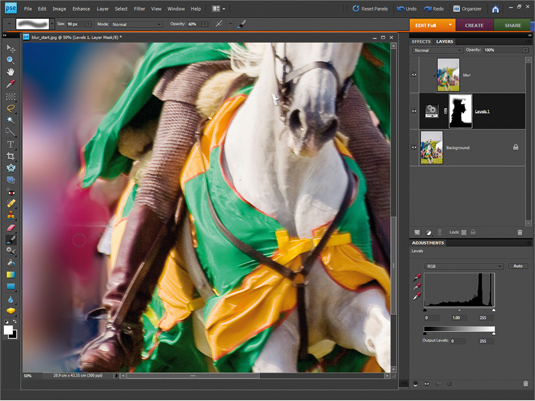
As you get closer to the subject, you need to reduce the size of the brush (use the [ key as a shortcut), and the Opacity (press the 7 key to reduce to 70%, 4 for 40% and so on). Take your time creating the mask, so you can't see the joins. Alt-clicking on the mask icon enables you to see (and paint on) the mask, and to highlight areas you might have missed.
This tutorial first appeared in Portrait Photography Made Easy - a bookazine from the makers of PhotoPlus.
Now read:
- 101 Photoshop tutorials
- 20 best Photoshop plugins
- 30 free Photoshop actions to create stunning effects
The Creative Bloq team is made up of a group of design fans, and has changed and evolved since Creative Bloq began over a decade ago. The current website team consists of five people: Editor Kerrie Hughes (currently on maternity leave), Acting Editor Rosie Hilder, Deals Editor Beren Neale, Senior News Editor Daniel Piper, and Staff Writer Amelia Bamsey. The 3D World and ImagineFX magazine teams also pitch in, ensuring that content from 3D World and ImagineFX is represented on Creative Bloq.
Related articles
blur a background in photoshop
Source: https://www.creativebloq.com/photoshop/blur-backgrounds-easily-photoshop-10121085
Posted by: renzibaxt1936.blogspot.com
0 Response to "blur a background in photoshop"
Post a Comment